The first meeting of the knitting group I started in our RV retirement community saw me and one new lady. I met Wendy who is a snowbird with her husband, traveling from Sasketchawan, Canada each winter to the warmer climate of Arizona. This is her first year staying in our park. Wendy, like me, loves working with her hands in various different crafts. She joined me on Friday also with the quilting group.
I finished ALL my gift giving projects and have them all ready for mailing to all the different points of the USA where my family and friends live. Now I can actually shift mental gears and begin my Christmas baking. But, never fear, I already have my mind full of all the new projects I want to begin starting in the new year in just a few weeks. But until then, I will just knit on current projects, furthering their progress toward completion. Steve and I discussed the new year projects together. We decided that I should concentrate on projects that are for me, our new home, and small gifts that will be quick to make. Of course, I want to continue designing. I'm really looking forward to the challenges already. <grin>
Well, that's it for now. Just wanted to capture a few thoughts. Merry Christmas to each of you sharing this blog with me. I love you. Happy Birthday Lord Jesus. So glad I have the privilege to celebrate Your birth.
Monday, December 10, 2012
Saturday, December 1, 2012
New Beginnings from Previous Endings
Today is December 1st. This is the last month of this year. Wow it is difficult to realize that another whole year has been lived already. So much has happened in the last months since I last entered a post. I am up early this morning and just thought I would capture some of the adventure before it gets lost in the memories of times past.
October was the month when I took LOTS of classes at The Fiber Factory in Mesa, AZ and finished several projects at the other knit shops, too. I know now that I maxed my limitations that month. If I had taken one class more I would have been totally overwhelmed. As it was, I did finish each class and project just before needing to pack up the apartment and move from Scottsdale, AZ to Bullhead City, AZ where I am now residing.
I started a Fair Isle sweater in September and worked feverishly to complete it by the end of October. I did complete it except for the addition of the sleeves, but that was okay with me because I only wanted to learn the techniques not actually wear the sweater. I am very pleased with the results but have decided that Fair Isle is a little too intense for me. I will probably only use it for borders or small area designing. I like the colors and some designs better than others. I did not like the heaviness of the completed project. But I did use scrap yarn which was not all matched for weight and content. So I would definitely use a lighter weight yarn when making another sweater should that ever happen. I am pleased that I learned how to carry two different colors using both hands. I am pleased that I learned how to hide the beginning ends of yarn when first starting with a new color. Wrapping the yarn as I knit is a good way to strand the yarn without leaving the loose strands that are so easily caught when wearing the garment - another nice technique. Most of all, the purpose for desiring to take the class was to learn how to make and use steeks. This I did. Neat!
I finally started knitting a pair of convertible mittens using a kit I bought from Knit Picks back in 2009. The kit included the pattern and all the yarn required to complete the project. The yarn is a lovely DK weight of a wool-silk blend. The mittens are striped and thus I have five different colors to use. There is lots of shaping using double pointed needles so the challenge was to learn how to knit all the different fingers and thumb shapes while working small areas with yarn held on stitch holders. There is lots of bulk and maneuvering in tight spaces to make it work. I did find it cumbersome and somewhat difficult to tighten the place of joining at the beginning of each finger. While I am not actually pleased with the finished results, I am pleased that I made these mittens because I learned how to knit them. Will I make another pair another time? Well, for now that remains to be seen. Mittens fall into the same category as socks. For me, I don't really enjoy making them but I am pleased that I know how if I want to.
During October I also took a class learning to knit unmentionables - AKA panties and bra. This class was fun. I enjoyed learning how to shape the buttock area using short rows. I struggled with this concept using my own design that didn't work quite so well. Danielle, the instructor, showed me a different way, which worked much better. I shaped the bras a little differently, too. I decided I liked a wider version with a front closure. When finished I did purchase a book with other "fancy" patterns called Sexy Little Knits written by celebrity swimsuit designer Ashley Paige. There is a real cute pattern in this book for a bathing suit cover up that I bought yarn to knit.

I took a class in October to learn Hairpin Crochet Lace. This craft requires a special tool for crocheting the yarn into a loopy lace. The process is simple to learn but laborious and somewhat boring to execute. The long panels required seemed to take forever to complete. When finished the panels are then attached to each other, which again seemed to take forever. I didn't really enjoy this project like I usually do. I did see the value of being able to teach the grandchildren something new that would be easy for them, but I wasn't able to visualize additional designs with this skill. So I will probably not be doing this again.

The shop Knit Happens started a charity project which I decided to do in October. Why not, huh? I began a booties pattern for newborns and premies. Haven't finished them yet, but will.
Oh and I forgot that I also heard of a gift desired by a friend of mine and knit that for her too during this time frame.
I also started a skirt pattern (Sasha Skirt) that I had admired for some time to knit for myself. Tempe Yarn & Fiber carried the pattern although I had first seen it at Knit Happens. I purchased the pattern and bought the yarn in some yummy colors in linen that I still think I can wear in Arizona. I have begun the skirt by knitting the waistband. I used the same technique I learned from Danielle while knitting the panties. Her technique was better than the one the pattern used.

I finally took a class learning tatting. The technique I used was needle tatting rather than using shuttles. I was told that needle tatting is quicker and easier. I did enjoy the class very much. Found the technique is more simple than I expected. Tatting is used to design elegant edgings using chains and picots. Purchasing lace edging already made is easier and probably cheaper, but the tatted designs is an old art that I am very glad I have learned. Not sure what I will do with this skill just yet.

The last class I took before moving was Continental Knitting. I have always wanted to learn how to hold the yarn in both hands while knitting, but was taught the English method. So with this class I finally learned the secrets. BUT - I didn't care for the new way at all. I didn't find it easier or quicker. So I will keep my way for now and maybe try it again later. Probably not. <grin>
And of course, I am still designing. Currently working on a ribbed/cabled tank top.
With that last class out of the way and my projects finally completed (at least to the point I wanted them), I made the switch to packing boxes and moving and unpacking boxes. For those of you who follow what happens to me, here is the lowdown...
We bought a park model in a senior retirement community to be close to Steve's parents as they age so they can have peace of mind and not worry about what will happen to them or the care they might receive. We have not owned our own place before so this is quite the adventure for us. The park model sat empty for almost two years and was very dirty and in much need of TLC. Steve has taken to the task admirably. He spared me as much effort as possible by hiring Molly Maids to clean the apartment for the final inspection and two men to carry the boxes and load the truck saving me the up and down the steps routine. In Bullhead City he hired another cleaner to come in and empty the trailer and clean everything so we could move in without any hinderance. He also scheduled two unpackers to help us unload the truck after we arrived. Steve's dad took a power sprayer and cleaned the outside before we arrived. Steve's mom washed the bed linens and remade the bed so we could arrive without that chore facing us. That Friday, the day of moving, went smoothly. We arrived at 10:00 pm that evening tired but happy to have reached our anticipated destination safely.
The name of the park is Riverside Resort. The next morning was busy with a park-wide yard sale. Steve and I quickly sorted the items taken from the park model into the things we wanted to keep and the things we didn't. We placed all the unwanted items in the driveway with a sign that read "Free Items". By the end of the day, everything was gone. Then we proceeded to visit the other park owners to see what we might find to make our move easier. We bought a real nice desk that fit under one living room window nicely. We had built a makeshift desk in the apartment but dismantled it before we left. The new desk adds a real nice homey feeling to the front room and made it easy for us to continue with business issues while we found places for everything in the boxes. The unpackers arrived and transferred everything from the truck to the porch and the move-in began.
I must have been moving at full adrenal gland throttle because I worked hard until very late and then woke too early to begin again. But I couldn't actually rest until I had finished the task, so I just kept moving along. Finally about 4-5 days later I had everything out of the boxes and situated in the closets and cabinets the way I wanted. It amazes me that everything fit. The park model is smaller than the apartment and shorter than the motor coach, although a little wider. So I am amazed that all my things actually packed away as nicely as they have. I have two closets in the bedroom. Steve and I are sharing one for our clothing. The closet doors slide back and forth giving each of us one side. The bed fits in the room with approximately 2.5 feet around all edges. Tight but doable. The other closet is where all the items that were previously stored in the five foot lockers that we kept in the bus bay area and then underneath the bed in all following living quarters. These foot lockers held all my project supplies. I now have a closet with my tools, fabrics, yarns, and dress form. I also was able to store all those items that everyone keeps but does not necessarily use all the time, like old photos and all those things the children and grandchildren give me.
The kitchen was a real challenge. I have lots of kitchen tools, gadgets, cookbooks, food items, etc. I sorted everything into the areas where they will be used and then proceeded to pack them for ease of use. This took two long days. I moved and rearranged and then moved again until I had it just right. Now I can maneuver in my kitchen easily. I am still discovering where I put things and forgetting just how to cook smoothly. But I know that will become easier as I adjust. It was actually funny when I prepared the first meal. My mind would remember where the needed item(s) were in the apartment, then think of the box into which it was packed, then where I placed it in the new kitchen. I would stand in the center of the room, turning while reflecting, then finally retrieve the necessary tool. Steve was hopeless. He just stood there with a blank expression. I told him just to ask until he finally knew where everything was now placed. Now, a month later, he hardly asks at all but moves about almost as easily as I do.
Another challenge for me was arranging my knitting supplies for easy access. In the apartment, I had my yarn, my books, my projects all arranged for easy close access around me. I could sit and knit. I could talk on the phone and knit. I could visit and knit. I could watch TV and knit. I could eat and knit. All my books were on the shelf under the table in front of the couch in the living room where I sat. Get the point. Well, the new place had no table in front of the couch with a shelf underneath. The new place had no space around it for the tools, yarn, or projects. Consternation! What to do? I was actually experience withdrawal symptoms and much distress!!! First order of business was to fix me. I arranged a table beside my chair that allowed my current projects to be handy and easy to pick up at a moment's choosing. Then the cookbooks were rearranged so that the bookshelf could now hold the knitting books instead. Not as close as before, but still only a few steps away. I could feel the relief already. Now, where to put the yarn. Ahhhhh, the closet with new plastic drawers made my access even easier than the footlockers under the previous bed. Now I was breathing more slowly and actually relaxing and planning my next project after the mittens were finished. Life was back to my normal and I could now enjoy living here. Everything is in order again. <smile>
Once we were unpacked Steve and I started meeting the other park members (our neighbors) by joining several ongoing and special planned community events. Of course, we met many new friends at the yard sale and those passing our place curious about our arrival. My first visit was with the gals meeting to make quilts. I am now piecing fabric for the current project - oval placemats. I chose colors that are in my china and hope the finished mats will enhance the place setting. If not, someone gets them as a gift or I sell them at the next yard sale. No matter, I learn the techniques. I also decided to make the "mystery quilt" project. I was right in time to receive the first week's task. I bought the fabric learning about fat quarters in the process. We are currently at the fourth week's task. I have cut my fabric, sewn several together and now will place those pieces into a design I like; then stitch. With all the grandchildren I have, someone will benefit from my efforts.
There is no knitting groups in our park that I have found. One lady knits or crochets, not sure which, prayer shawls that she gives away in church for those who need one. There are no knit shops in Bullhead City. The closest one is in Kingman, which is 45 mins. drive away. So I have started my own group. I placed an announcement in the monthly newsletter and expect to see some others join me throughout December.
Steve's parents love to gamble and go to the casino regularly. They enjoy Bingo as well. Steve and I joined them at the casino for the bus trip with free buffet excursion. We also joined them for the weekly playing at the clubhouse across the street from our place. We have decided that we will not be doing this very often. We don't enjoy just handing our money to the casinos and can enjoy a better time eating a buffet without the gambling as part of the package. Anyway, Steve reminded me that we need to spend our time remodeling our place and not throwing away our money "hoping" to win. I agree!
There is a weekly "potluck" dinner and we participate in it eagerly. We meet many of our neighbors and get to enjoy the fun of the various dishes prepared each week. We will happily continue this activity. We were invited to try pickle ball, which we did, and while we enjoyed ourselves, we will probably only do that if another couple wants to plan a game or two. We gave water aerobics a try and will do that when we can, but right now it conflicts with the quilting group and I prefer to keep that activity. We went to "Stretch and Tone" a couple times and will do that as often as we can. It is early in the morning and we don't always rise and shine at that time. We began learning to line dance, which we both enjoy. That will be a keeper activity. Mom and I go to Bunco, a dice game, each week. We enjoy the fun of that game and I will probably continue that with her. We currently attend church here in the park each Sunday, but we may find a church home elsewhere. Add laundry, cooking, cleaning, shopping, and the holiday celebrations and you have two very busy people right now. But we are finding our new home to be very satisfying. We may be here to stay for a very long time. <fingers crossed>
Steve is planning to double our floor space by enclosing the porch. Most people make an Arizona room from their addition, but we are going to enclose the porch and remove the center walls, rearrange the room designs and open up the ceiling. I drew the design on paper so he could better see what is needed. There are lots of HOA regulations and city limitations we need to consider. As soon as we can decipher all the information, plan our work schedule, and make sure the funds are in place, we will begin. Right now, however, we have our hands full just getting the current place livable in the mean time.
So there you have it. I am up to date with my blog. Now it is time to go knit. See you later.
October was the month when I took LOTS of classes at The Fiber Factory in Mesa, AZ and finished several projects at the other knit shops, too. I know now that I maxed my limitations that month. If I had taken one class more I would have been totally overwhelmed. As it was, I did finish each class and project just before needing to pack up the apartment and move from Scottsdale, AZ to Bullhead City, AZ where I am now residing.
I started a Fair Isle sweater in September and worked feverishly to complete it by the end of October. I did complete it except for the addition of the sleeves, but that was okay with me because I only wanted to learn the techniques not actually wear the sweater. I am very pleased with the results but have decided that Fair Isle is a little too intense for me. I will probably only use it for borders or small area designing. I like the colors and some designs better than others. I did not like the heaviness of the completed project. But I did use scrap yarn which was not all matched for weight and content. So I would definitely use a lighter weight yarn when making another sweater should that ever happen. I am pleased that I learned how to carry two different colors using both hands. I am pleased that I learned how to hide the beginning ends of yarn when first starting with a new color. Wrapping the yarn as I knit is a good way to strand the yarn without leaving the loose strands that are so easily caught when wearing the garment - another nice technique. Most of all, the purpose for desiring to take the class was to learn how to make and use steeks. This I did. Neat!
 |
| Steek knit in reverse stitch that can now be cut. The edging allows for easy picking up of stitches for then adding the sleeve or whatever else is needed. |
 |
| Side view with steel. |
 |
| Front view with pattern design clearly seen and collar finished. |
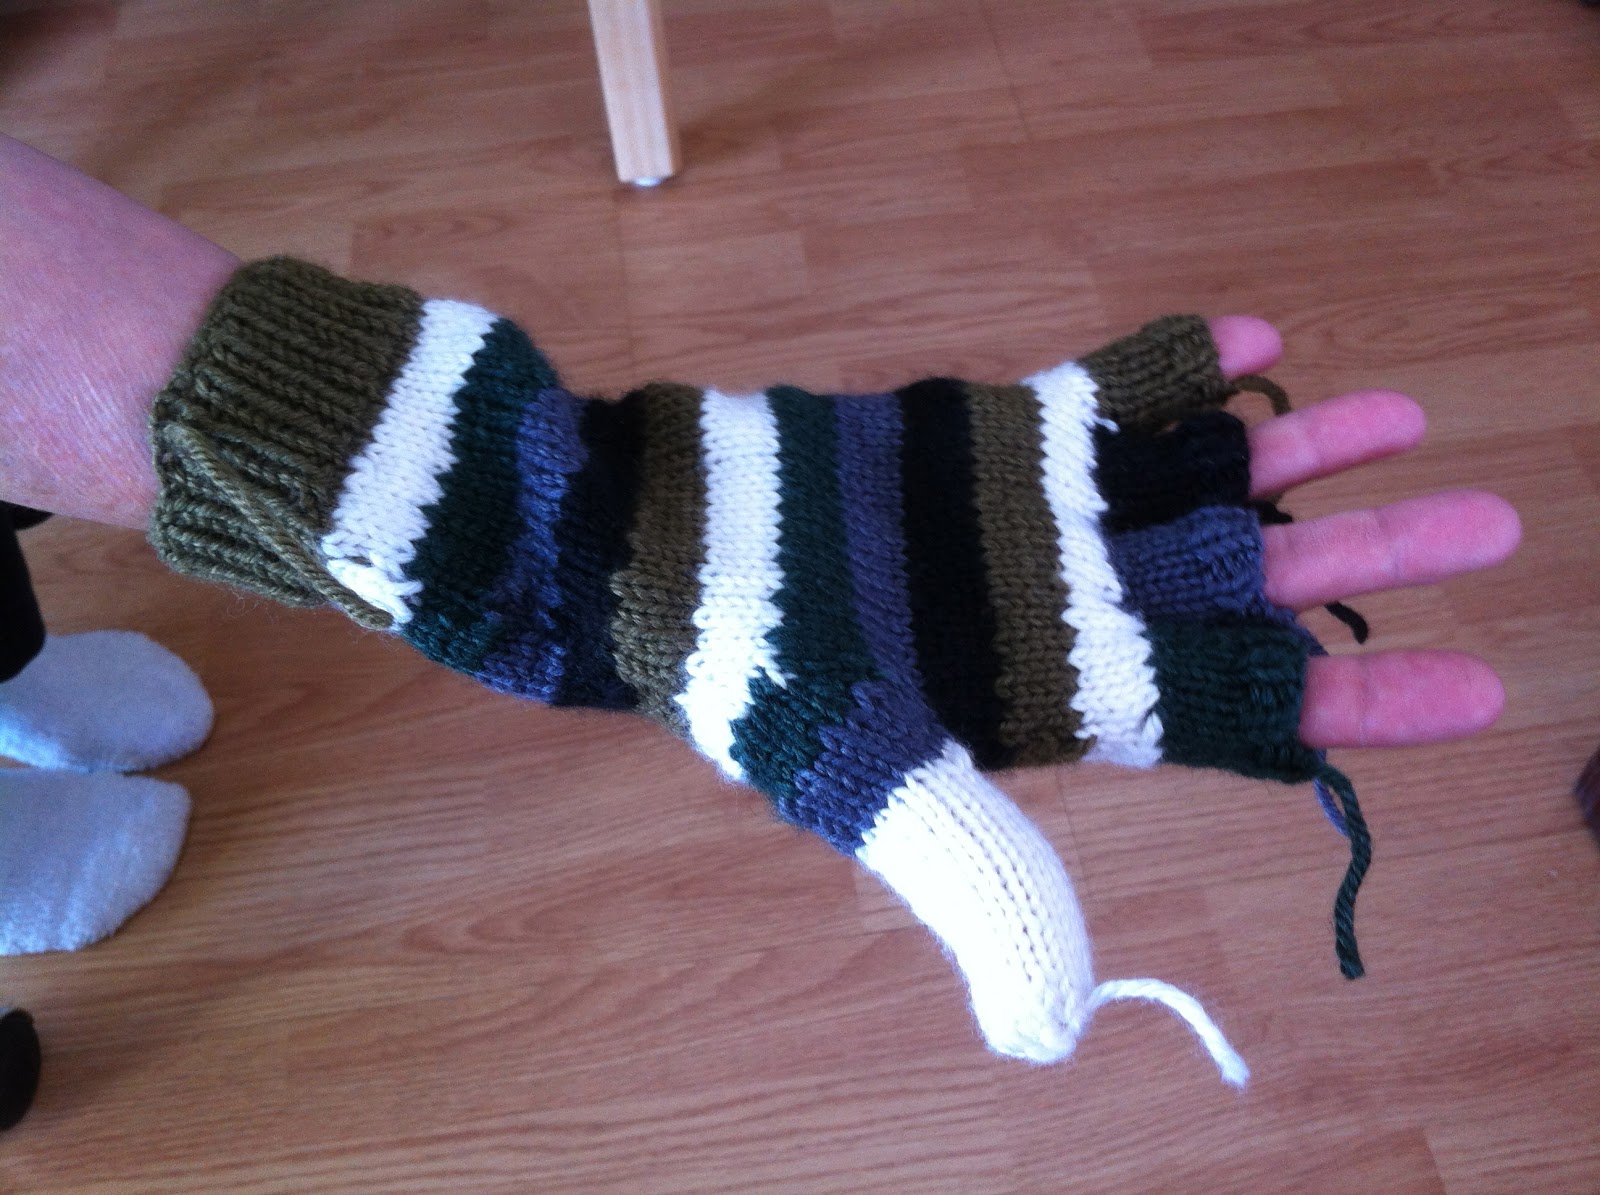 |
| Palm Side |
 |
| Mitten Top Covering Fingers |
 |
| Fingers Exposed, Mitten Top Pulled Back |
 |
| Back of Hand |
 |
| Panties with short row shaping. Sides not stitched together. Unfinished waistband. |
 |
| Bra with shaping by increases and decreases stitches. Straps not knit as yet. Front closure. |

I took a class in October to learn Hairpin Crochet Lace. This craft requires a special tool for crocheting the yarn into a loopy lace. The process is simple to learn but laborious and somewhat boring to execute. The long panels required seemed to take forever to complete. When finished the panels are then attached to each other, which again seemed to take forever. I didn't really enjoy this project like I usually do. I did see the value of being able to teach the grandchildren something new that would be easy for them, but I wasn't able to visualize additional designs with this skill. So I will probably not be doing this again.
 |
| Hairpin Crochet Lace Frame with Finished Scarf |

The shop Knit Happens started a charity project which I decided to do in October. Why not, huh? I began a booties pattern for newborns and premies. Haven't finished them yet, but will.
Oh and I forgot that I also heard of a gift desired by a friend of mine and knit that for her too during this time frame.
I also started a skirt pattern (Sasha Skirt) that I had admired for some time to knit for myself. Tempe Yarn & Fiber carried the pattern although I had first seen it at Knit Happens. I purchased the pattern and bought the yarn in some yummy colors in linen that I still think I can wear in Arizona. I have begun the skirt by knitting the waistband. I used the same technique I learned from Danielle while knitting the panties. Her technique was better than the one the pattern used.

I finally took a class learning tatting. The technique I used was needle tatting rather than using shuttles. I was told that needle tatting is quicker and easier. I did enjoy the class very much. Found the technique is more simple than I expected. Tatting is used to design elegant edgings using chains and picots. Purchasing lace edging already made is easier and probably cheaper, but the tatted designs is an old art that I am very glad I have learned. Not sure what I will do with this skill just yet.

 |
| I made these. Aren't they lovely? So delicate and dainty! |
The last class I took before moving was Continental Knitting. I have always wanted to learn how to hold the yarn in both hands while knitting, but was taught the English method. So with this class I finally learned the secrets. BUT - I didn't care for the new way at all. I didn't find it easier or quicker. So I will keep my way for now and maybe try it again later. Probably not. <grin>
And of course, I am still designing. Currently working on a ribbed/cabled tank top.
With that last class out of the way and my projects finally completed (at least to the point I wanted them), I made the switch to packing boxes and moving and unpacking boxes. For those of you who follow what happens to me, here is the lowdown...
We bought a park model in a senior retirement community to be close to Steve's parents as they age so they can have peace of mind and not worry about what will happen to them or the care they might receive. We have not owned our own place before so this is quite the adventure for us. The park model sat empty for almost two years and was very dirty and in much need of TLC. Steve has taken to the task admirably. He spared me as much effort as possible by hiring Molly Maids to clean the apartment for the final inspection and two men to carry the boxes and load the truck saving me the up and down the steps routine. In Bullhead City he hired another cleaner to come in and empty the trailer and clean everything so we could move in without any hinderance. He also scheduled two unpackers to help us unload the truck after we arrived. Steve's dad took a power sprayer and cleaned the outside before we arrived. Steve's mom washed the bed linens and remade the bed so we could arrive without that chore facing us. That Friday, the day of moving, went smoothly. We arrived at 10:00 pm that evening tired but happy to have reached our anticipated destination safely.
The name of the park is Riverside Resort. The next morning was busy with a park-wide yard sale. Steve and I quickly sorted the items taken from the park model into the things we wanted to keep and the things we didn't. We placed all the unwanted items in the driveway with a sign that read "Free Items". By the end of the day, everything was gone. Then we proceeded to visit the other park owners to see what we might find to make our move easier. We bought a real nice desk that fit under one living room window nicely. We had built a makeshift desk in the apartment but dismantled it before we left. The new desk adds a real nice homey feeling to the front room and made it easy for us to continue with business issues while we found places for everything in the boxes. The unpackers arrived and transferred everything from the truck to the porch and the move-in began.
I must have been moving at full adrenal gland throttle because I worked hard until very late and then woke too early to begin again. But I couldn't actually rest until I had finished the task, so I just kept moving along. Finally about 4-5 days later I had everything out of the boxes and situated in the closets and cabinets the way I wanted. It amazes me that everything fit. The park model is smaller than the apartment and shorter than the motor coach, although a little wider. So I am amazed that all my things actually packed away as nicely as they have. I have two closets in the bedroom. Steve and I are sharing one for our clothing. The closet doors slide back and forth giving each of us one side. The bed fits in the room with approximately 2.5 feet around all edges. Tight but doable. The other closet is where all the items that were previously stored in the five foot lockers that we kept in the bus bay area and then underneath the bed in all following living quarters. These foot lockers held all my project supplies. I now have a closet with my tools, fabrics, yarns, and dress form. I also was able to store all those items that everyone keeps but does not necessarily use all the time, like old photos and all those things the children and grandchildren give me.
The kitchen was a real challenge. I have lots of kitchen tools, gadgets, cookbooks, food items, etc. I sorted everything into the areas where they will be used and then proceeded to pack them for ease of use. This took two long days. I moved and rearranged and then moved again until I had it just right. Now I can maneuver in my kitchen easily. I am still discovering where I put things and forgetting just how to cook smoothly. But I know that will become easier as I adjust. It was actually funny when I prepared the first meal. My mind would remember where the needed item(s) were in the apartment, then think of the box into which it was packed, then where I placed it in the new kitchen. I would stand in the center of the room, turning while reflecting, then finally retrieve the necessary tool. Steve was hopeless. He just stood there with a blank expression. I told him just to ask until he finally knew where everything was now placed. Now, a month later, he hardly asks at all but moves about almost as easily as I do.
Another challenge for me was arranging my knitting supplies for easy access. In the apartment, I had my yarn, my books, my projects all arranged for easy close access around me. I could sit and knit. I could talk on the phone and knit. I could visit and knit. I could watch TV and knit. I could eat and knit. All my books were on the shelf under the table in front of the couch in the living room where I sat. Get the point. Well, the new place had no table in front of the couch with a shelf underneath. The new place had no space around it for the tools, yarn, or projects. Consternation! What to do? I was actually experience withdrawal symptoms and much distress!!! First order of business was to fix me. I arranged a table beside my chair that allowed my current projects to be handy and easy to pick up at a moment's choosing. Then the cookbooks were rearranged so that the bookshelf could now hold the knitting books instead. Not as close as before, but still only a few steps away. I could feel the relief already. Now, where to put the yarn. Ahhhhh, the closet with new plastic drawers made my access even easier than the footlockers under the previous bed. Now I was breathing more slowly and actually relaxing and planning my next project after the mittens were finished. Life was back to my normal and I could now enjoy living here. Everything is in order again. <smile>
Once we were unpacked Steve and I started meeting the other park members (our neighbors) by joining several ongoing and special planned community events. Of course, we met many new friends at the yard sale and those passing our place curious about our arrival. My first visit was with the gals meeting to make quilts. I am now piecing fabric for the current project - oval placemats. I chose colors that are in my china and hope the finished mats will enhance the place setting. If not, someone gets them as a gift or I sell them at the next yard sale. No matter, I learn the techniques. I also decided to make the "mystery quilt" project. I was right in time to receive the first week's task. I bought the fabric learning about fat quarters in the process. We are currently at the fourth week's task. I have cut my fabric, sewn several together and now will place those pieces into a design I like; then stitch. With all the grandchildren I have, someone will benefit from my efforts.
There is no knitting groups in our park that I have found. One lady knits or crochets, not sure which, prayer shawls that she gives away in church for those who need one. There are no knit shops in Bullhead City. The closest one is in Kingman, which is 45 mins. drive away. So I have started my own group. I placed an announcement in the monthly newsletter and expect to see some others join me throughout December.
Steve's parents love to gamble and go to the casino regularly. They enjoy Bingo as well. Steve and I joined them at the casino for the bus trip with free buffet excursion. We also joined them for the weekly playing at the clubhouse across the street from our place. We have decided that we will not be doing this very often. We don't enjoy just handing our money to the casinos and can enjoy a better time eating a buffet without the gambling as part of the package. Anyway, Steve reminded me that we need to spend our time remodeling our place and not throwing away our money "hoping" to win. I agree!
There is a weekly "potluck" dinner and we participate in it eagerly. We meet many of our neighbors and get to enjoy the fun of the various dishes prepared each week. We will happily continue this activity. We were invited to try pickle ball, which we did, and while we enjoyed ourselves, we will probably only do that if another couple wants to plan a game or two. We gave water aerobics a try and will do that when we can, but right now it conflicts with the quilting group and I prefer to keep that activity. We went to "Stretch and Tone" a couple times and will do that as often as we can. It is early in the morning and we don't always rise and shine at that time. We began learning to line dance, which we both enjoy. That will be a keeper activity. Mom and I go to Bunco, a dice game, each week. We enjoy the fun of that game and I will probably continue that with her. We currently attend church here in the park each Sunday, but we may find a church home elsewhere. Add laundry, cooking, cleaning, shopping, and the holiday celebrations and you have two very busy people right now. But we are finding our new home to be very satisfying. We may be here to stay for a very long time. <fingers crossed>
Steve is planning to double our floor space by enclosing the porch. Most people make an Arizona room from their addition, but we are going to enclose the porch and remove the center walls, rearrange the room designs and open up the ceiling. I drew the design on paper so he could better see what is needed. There are lots of HOA regulations and city limitations we need to consider. As soon as we can decipher all the information, plan our work schedule, and make sure the funds are in place, we will begin. Right now, however, we have our hands full just getting the current place livable in the mean time.
So there you have it. I am up to date with my blog. Now it is time to go knit. See you later.
Monday, October 8, 2012
October 7, 1992
Yesterday I didn't post anything because I was too busy knitting. Ha! But I made lots of progress. I needed to knit 7 1/2 inches plus the waistband casing for the panties before my class this Thursday. I finished the last 2 inches and have them ready for class. I also needed to prepare several hairpin lace panels for the class this Friday so the instructor can show me how to join the panels using different finishing techniques. My friend, Pat Finn, called and asked me to meet her at Tempe Yarn & Fiber to knit with her for a couple hours. I drove over there and crocheted four additional panels while chatting with her. After arriving home, I prepared some pears for dehydrating and then sat down to knit while watching old TV shows and a couple movies. Because I was so busy getting the other project ready for upcoming classes, I was behind on my knitting quota for the Fair Isle Pullover. I still needed to complete 3 rows for last Thursday, which I did. I still needed to knit the 5 rows for Friday, which I did. And I needed to knit the 5 rows for yesterday, which I completed 1 of those. So I am behind by 4 rows and still need to knit the 5 planned for today. That's good. I will attend church and then go to Knit Happens to participate in a charity knit making booties for newborns & preemies. After returning home, I can settle down and complete the additional 9 rows. Should I be unable to do that, Monday is a free day and I can catch up and hopefully knit ahead of my quota then. Here is the progress I have made thus far...


________________________________________________________________________
I went to Knit Happens in Scottsdale, which is the closest yarn shop to me, yesterday after lunch and got the charity knit pattern for preemie hats. I started the bootie pattern while there. The shop was busy but I decided to go home and sit comfortably rather than on the chair at the table there. And I was really wanting to finish the rows needed to be completed on the Fair Isle Pullover.
Well, I completed all the required rows that I was delinquent in finishing and two of the five that I needed to do yesterday. That means I only have 7 rows to do tomorrow. That's fine because I have a clear calendar for tomorrow. I will do my best to finish today's last three rows, tomorrow's quota and then see how many rows I can knit ahead. That will really take a lot of pressure off of me.
________________________________________________________________________
This upcoming week is filled with lots of knitting activity, too.
- Monday - open and free
- Tuesday - My knitting group "Knotty But Nice" meets at Tempe Yarn & Fiber (Tempe). I purchased the Sasha pattern and some Louet linen yarn in some really scrumptious colors to make a skirt for myself.
- Wednesday - My knitting group "The Needlers" meets at Jessica Knits & Crochets (Scottsdale). I will continue knitting the mittens from the kit I purchased from Knit Picks.
- Thursday - My second of four classes at The Fiber Factory (Mesa) for knitting the unmentionables (panties) that I have knitted to the place where we will next begin.
- Friday - My last class at The Fiber Factory (Mesa) for crocheting the hairpin lace. I have several panels ready for joining. I will try to crochet some panels for a scarf pattern I found before then if I can. That way the instructor can assist me before the class ends that day.
- Saturday - open and free - a good day to catch up on everything.
- Sunday - A KAL (knit along) at Knit Happens. I will be knitting a hat (Poppy Hat Pattern). I have the pattern but still need to choose the yarn I will use from my stash.
Friday, October 5, 2012
October 5, 2012
Took my class this afternoon and learned how to use a hairpin lace frame and knitted some lacework. It was quite simple really but if I had not had the instructor show me how, I don't think I could have figured it out for myself. This is an old lace technique. I'm glad to have learned it. I had no idea what to make with the panels I finished, but I found a pattern for a shawl that I think I will tackle. Just another project, huh? Why not? Anyway, here are some photos to show my progress.
Now this will be short, because I have lots to knit and crochet. Catch you later.
 |
| Notice the frame on the left. The yarn is wrapped around it in a specific way and crocheted in the middle to hold everything together. This also provides the hairpin lace design. The panel on the right is one finished panel of thirty (30) loops. |
 |
| Close up view of the two panels that have been joined together by weaving the loops down the side of each. |
 |
| Two panels joined to make one piece. |
Thursday, October 4, 2012
October 4, 2012
Funny night. Busy, too! I was knitting all throughout my dreaming. Imagine that, since I knit four long rows of Fair Isle just before going to bed. I guess my brain just couldn't stop the "knitting process".
I checked my dehydrating fruit that I left to dry overnight and found that I had made my first rollups. Both the raspberries and the kiwi had dried nicely. I wrapped the rollups in plastic wrap and put both them and the kiwi in separate plastic bags. I like my new dehydrator and plan to use it frequently to dry fresh produce while in season. Storage takes less space than canned or frozen produce.
Today I am taking a new class at The Fiber Factory. This class will be teach how to make "unmentionables" aka underwear. I haven't seen the pattern yet but will get it once I start class. Yesterday I bought a book called Romantic Style by Jennie Atkinson. This book contains lots of patterns for fancy, feminine wear. I had seen one particular pattern for a dressing gown that I wanted to make. I didn't buy the book when I first saw it and then later I couldn't find it when I decided to get it. Well yesterday I saw it again. There was only one book left on the shelf and I knew I was to buy it before it disappeared again. There are also some patterns for underwear in it and I was hoping to get some ideas for what to expect in today's class. I have 500 yd. of beautiful pink cashmere silk that I hope to use for this new project. Not sure if it is the correct yarn weight for the pattern but I am taking it with me to see.
Now I will take a shower and hopefully still have time to knit at least one row of the Fair Isle Pullover before time to leave for the class.
_________________________________________________________________________________
I was able to complete 1 1/2 rows before I left for class. Hooray! Now only 3 1/2 to go. That should be easy enough between appointments.
I have 500 yards of some pink cashmere silk that I am hoping will work for this pattern I will be learning today. I needed to search the Internet to get the information about the yarn - what size needle to use, etc. It is a lovely worsted weight called Classic Elite Yarns Posh Prints made in Italy. The yarn was given to me from several friends. We each received one skein from a shop we visited while doing a "yarn crawl". This is when several of us get together and tour several shops we want to visit. This shop was in northern Arizona called Knit 1 Bead 2 in Jerome, AZ. We also visited the knitting shops in Sedona and Flagstaff during that "crawl". Anyway, three of the ladies didn't want their skein and gave each to me, making four skeins each with 125 yd of yarn, thus 500 yds. I have not found a pattern in which to use this yarn thus far and so I'm hoping today will be the day. I chose the appropriate needles (size 8) and am prepared for class.
_________________________________________________________________________________
I was not able to use my yarn. If I only wanted to make the panties I would have enough but not if I want to make a bra, too. So I chose a different yarn. I will use the pink cashmere/silk for a chemise or something else that's real pretty. My needles won't work either, so I borrowed the correct ones from the shop. I will return them tomorrow after I get home and transfer my work to my own needles.
My class was wonderful. I am on my way to knitting a pair of panties in a beautiful navy DK weight bamboo/wool yarn by Sirdar (Snuggly Baby Bamboo). The pattern calls for 400 yards. It is yummy soft. The first part of the class was spent taking measurements to configure the total stitches needed to cast on for each individual size. Danielle, the instructor, showed me how to do a long-tail cast on using two needles instead of one. Then the swatch had to be knit in order to determine the gauge for the pattern and to determine which needle size to use. My gauge is 6 stitches per inch using a size 6 needle in a stockinette stitch. I needed to cast on 125 stitches for the front. After that, I cast on the needed stitches and proceeded to knit the waistband for the front of the panties. The casing for the elastic is knitted as a hem, then the rest of the panties are knitted to the other end where the casing for the elastic is then bound off. I love the yarn and hope my measurements are correct because I want to be able to wear these when I am done. The panties are knitted in once piece starting with the front, decreasing with short rows through the crotch and then increasing to finish the back. The diagram of the pattern looks like an hour-glass. I put another 4 skeins of the yarn on hold just in case there is enough time to knit a bra to match the panties. I wanted to make sure the yarn matched.
Right now I am quickly knitting the waistband casing for the required 1 1/2 inches so I can transfer the borrowed needles from the shop to my own. This means I will probably not finish the required 3 1/2 rows needed for today's quota on the Fair Isle Pullover. That's okay. I have most of tomorrow free, except for one class, and I will knit the rest of today's and tomorrow's quota together. Whew!!!! I knew I was going to need to dove-tail. This is one of those times.
_________________________________________________________________________________
KaTie Jackson, my friend and knitting buddy from church, and I are going to visit Jessica Knits & Crochets tonight. They are starting a charity knit once a month and both of us are interested to hear the details. KaTie likes to knit blankets and this charity is called The Linus Project. The knitted blankets and squares for making blankets are donated to seriously ill and traumatized children.
Well, KaTie just called. She just had a tooth pulled so we won't be going to the knit shop tonight. That's okay. The meetings for this charity work will be held the first Thursday of each month, so we will try again for next month. That means I will actually be able to continue knitting tonight and maybe even finish all of my quota for today. I told KaTie I would come by her home for a little while in case she needs anything. I will take my knitting and we will knit and watch TV together for a couple hours. How's that for fluidity? Still get a night of fun with my friend.
Well more changes...KaTie was feeling worse than she thought and decided to go to bed. So I will stay home and knit more rows for my quota. Still a nice ending to a great day.
Designing Plans
I am amazed at the progress I have made this year in designing. I started with one idea and now have several. I was impressed by Cat Bordhi in one of her classes that I took at Tempe Yarn and Fiber in Tempe, AZ to design something with the rib stitch. She gave us a sample to examine and asked the class to discover how the pattern was knitted. I did and was fascinated with the stitch design. That started my "design juices" flowing and I began my first pattern. I call my pattern "Cable Me One Side - Rib Me The Other". I have already completed patterns for a hat, a mobius, a scarf, a skirt and I am currently designing a tank top. I have plans for patterns for hand warmers, matching leg warmers, socks, and sweaters, both pullover and cardigan. Each of these patterns use the basic rib design with cables on one side. I have changed the cable pattern so that it is different for each pattern. The skirt is designed with several options that totally change the look of each skirt but use the same basic pattern. This will be true for the sweaters, too. It seems that each time I finish one pattern, another variation pops into my mind. I am hoping that I can finish all of these and even get them printed into a book maybe. Right now, however, I am just enjoying the process of creating my own designs.
Today I will attend the session with my knitting group, The Needlers, at Jessica Knits & Crochets in Scottsdale, AZ. We meet each Wednesday for a couple hours to knit and socialize. I am currently knitting a pair of mittens during those sessions. I really enjoy sitting and knitting and chatting and knitting and shopping and knitting. We have such fun each week. We are a close-knit group, pun intended.
Returning home, I will engage myself with completing five rows of the Fair Isle Pullover Sweater that I am knitting for the class I am taking at The Fiber Factory in Mesa, AZ each Tuesday morning. I have estimated that I need to knit five rows daily in order to be at the place in the pattern requiring help from the instructor. I am knitting the sweater in the round on circular needles, which will make one long tubular sweater. When the tube is long enough to reach the underarms, I must make steeks at each juncture where the sleeves will be placed. I have never knitted a steek before, which is why I am taking the class. Once the steeks are knitted and the sweater tube is completed to the top, the steeks are then cut (yes, I said cut - you know, with scissors) and the stitches around the cut opening are picked up so the sleeves can be knitted onto the tube. I have this humongus fascination with the idea of cutting the yarn that I have finished knitting. I am wondering how the garment will stay in tack without any unraveling. But since this is not a new technique, having been done for years and years over in Europe and maybe other countries I don't know, I am sure that it works. I just don't know how it is done. That is why I am taking the time to knit this sweater so I can learn.
Plus, as I have been knitting, especially the ribbing for the waistband, my mind has been toying with ideas of using Fair Isle designs in a ribbed/cabled pattern for my collection above. Hhhhmmmm, interesting! The ribbing is really neat looking with the seven color yarns I am using. It is a simple k2p2 ribbing and the colors are interchanged each two stitches. The main color is used for knitting and the other six colors are used for purling. The six colors are changed approximately every three or four rows, which can be altered any way I would want. This creates a very pretty pattern of striping. I can see how that would easily be adapted to cables across the ribbing. This pattern would require a lot more work than the simple patterns I have already designed. But I am up to the challenge. My mind is racing with the idea already. Okay, need to slow down a little. Too many other projects right now. I will save this one for next year. Whew!
END OF THE DAY
Well I really enjoyed my time with The Needlers. Elizabeth had returned from her vacation and we were all thrilled to see her again. I discovered immediately that I had already two rows too many with one color on the mittens. So I took out all those stitches and reknit them. I finished the five required rows and changed colors. I had knit three rows when I noticed that I had a hole where the last two colors were exchanged. So I took out those three rows and started again. Two rows later I still had a hole at the joining. So I took out the two rows and rejoined the yarns again. This time I got the join correct and was able to finish the three rows once again. The problem with joining yarns is that the yarn being added must be joined from underneath the yarn being replaced. There must be a twisting of sorts so that a hole doesn't remain. For some reason I just couldn't get the yarns twisted correctly. Strange, because I have done this many, many times. Oh well. It is fixed now.
After arriving home, I prepared some raspberries and some kiwi for dehydrating. I have a new dehydrator and wanted to try it. I made the raspberries into a fruit rollup and just sliced the kiwis. This took most of the afternoon, so it was pretty late in the day when I actually sat down to knit the last four rows of my required "five a day" for the Fair Isle Pullover. I was able to knit one row this morning after blogging and before attending my knitting session. So glad I did. I was really pushing it to finish the 5th row before going to bed. But I did.
Tuesday, October 2, 2012
October 2, 2012
Today is my granddaughter's birthday. She is 17 today. Happy birthday McKenzie!
This month I will be VERY BUSY with knitting projects. I am currently taking and/or signed up for several classes. I will go to the second class this morning to continue working on a Fair Isle Pullover Sweater. It is pretty intense with all the color and pattern changes in the design. But I want to learn how to make a steek. So thus, the class. I learned how to carry over the different colors by holding the main color in my right hand and the secondary color in the left. It becomes necessary to over/under lap the yarn not being used for the stitch.The idea is to make sure the unused yarn is caught by the used yarn so that it doesn't show in the front of the work. Now the yarn switches back and forth without having to swap the skeins each time the color changes. This is much quicker but my hands are slow right now because the technique is new.
I am also knitting some mittens. I am not sure who they are for at this time. I bought the kit from Knit Picks last year and just didn't take the time to knit the project until now. I am doing this every Wednesday with my knitting group, The Needlers.

I have made some progress with the tank top that I am designing. Here is what I have done thus far.
Starting Thursday I will take a class that will teach me how to make knitted unmentionables (aka underwear). I have chosen some cashmere silk yarn for this project. Hope I have enough. I only have
500 yds.
Then on Friday I am taking a class to learn how to tat using a tatting needle. I own tatting shuttles but this class indicated that using a needle is quicker and easier that tatting with a shuttle. So I am going to find out if this is true. Actually I don't know how to tat with the shuttles but I will take those classes later in November and December. Then I can decide for myself which I prefer.
Later this month I will take another class learning to make hairpin lace. I have always been fascinated by lace patterns and this is just another type. This is just another way to crochet, I think. Anyway, I am going to learn the technique and I'm looking forward to it.
And last but not least, I am going to take a class to learn how to do Continental Knitting. I never learned how and have been told that it will speed up my knitting, while reducing the stress on my wrists, shoulders, and elbows. It will also allow me to complete color work more efficiently. I hope I don't struggle too much with unlearning how I hold my yarn and knit now. I don't want to be the "old dog" that can't be taught "new tricks".
Well, that's it for now. Gotta get to my knitting. Going to have much to complete by deadlines for these classes.
This month I will be VERY BUSY with knitting projects. I am currently taking and/or signed up for several classes. I will go to the second class this morning to continue working on a Fair Isle Pullover Sweater. It is pretty intense with all the color and pattern changes in the design. But I want to learn how to make a steek. So thus, the class. I learned how to carry over the different colors by holding the main color in my right hand and the secondary color in the left. It becomes necessary to over/under lap the yarn not being used for the stitch.The idea is to make sure the unused yarn is caught by the used yarn so that it doesn't show in the front of the work. Now the yarn switches back and forth without having to swap the skeins each time the color changes. This is much quicker but my hands are slow right now because the technique is new.
 |
| The beginning of the Fair Isle Pullover Sweater |

I have made some progress with the tank top that I am designing. Here is what I have done thus far.
 |
| This is the swatch and the chart diagram. |
 |
| The beginning of the tank top. |
500 yds.
Then on Friday I am taking a class to learn how to tat using a tatting needle. I own tatting shuttles but this class indicated that using a needle is quicker and easier that tatting with a shuttle. So I am going to find out if this is true. Actually I don't know how to tat with the shuttles but I will take those classes later in November and December. Then I can decide for myself which I prefer.
Later this month I will take another class learning to make hairpin lace. I have always been fascinated by lace patterns and this is just another type. This is just another way to crochet, I think. Anyway, I am going to learn the technique and I'm looking forward to it.
And last but not least, I am going to take a class to learn how to do Continental Knitting. I never learned how and have been told that it will speed up my knitting, while reducing the stress on my wrists, shoulders, and elbows. It will also allow me to complete color work more efficiently. I hope I don't struggle too much with unlearning how I hold my yarn and knit now. I don't want to be the "old dog" that can't be taught "new tricks".
Well, that's it for now. Gotta get to my knitting. Going to have much to complete by deadlines for these classes.
Monday, October 1, 2012
September 30, 2012

 |
| I made a waistband and inserted elastic to fit my waist measurements. The white item at the top is a hanger. |
 |
| Here is a close up of the stitch pattern and hem. |
I have started another Cable Me One Side - Rib Me The Other project. A tank top.
 |
| This is the swatch for the tank top and the chart diagram. |
Saturday, July 28, 2012
July 28th 2012
After finishing the Twigs and Bobbles Shell I decided to knit an A-Line coat designed by Debbie Bliss. I purchased the yarn last year and just found the time to start and finish the project. I didn't especially like the yarn (Debbie Bliss)because there were bits of plant fibers spun with the wool and angora. It is a blue twead and the coat knit lovely with it however. I will insert a photo once I purchase the buttons and attach them.
The finished project.


Now I am again knitting the scarf I started designing - Cable Me One Side - Rib Me The Other Scarf. It is small and portable, which will make it easy to take and knit while I am gone next Monday through Wednesday. I still have the skirt to finish but it is not as portable. Well the notes aren't. Since I am still counting rows and working on the directions, I prefer to keep the notes close thus at home for now. I may carry this project with me once I pick it up again.

I will be gone for a month starting in August and will be teaching some friends how to knit. I have the pattern and will buy the yarn tomorrow. It is a sweater dress knit from the top down. If knit according to the pattern there are no seams to finish. Top down and no finishing. My kind of pattern. Will keep notes about this one. May want to use the techniques in future pattern designs. I will be using this away time to also capture my ideas on paper if I can, too. That's it for now.
Update: Finished my stay from home. I volunteered for a medical study. I did purchase yarn for the top-down dress but the student did not. So that yarn will be used for another project another time. I did take my skirt and made quite a bit of progress on it. I hope to finish it soon.
The finished project.


Now I am again knitting the scarf I started designing - Cable Me One Side - Rib Me The Other Scarf. It is small and portable, which will make it easy to take and knit while I am gone next Monday through Wednesday. I still have the skirt to finish but it is not as portable. Well the notes aren't. Since I am still counting rows and working on the directions, I prefer to keep the notes close thus at home for now. I may carry this project with me once I pick it up again.
 |
| As you can see, one side is cabled and the other side is ribbed. Completely reversible. Very simple to make. A quick project. I loved this yarn, too. |

I will be gone for a month starting in August and will be teaching some friends how to knit. I have the pattern and will buy the yarn tomorrow. It is a sweater dress knit from the top down. If knit according to the pattern there are no seams to finish. Top down and no finishing. My kind of pattern. Will keep notes about this one. May want to use the techniques in future pattern designs. I will be using this away time to also capture my ideas on paper if I can, too. That's it for now.
Update: Finished my stay from home. I volunteered for a medical study. I did purchase yarn for the top-down dress but the student did not. So that yarn will be used for another project another time. I did take my skirt and made quite a bit of progress on it. I hope to finish it soon.
Thursday, July 19, 2012
New Decrease Stitch For Me
s2togkpo
slip next 2 stitches as if to knit 2 together, knit 1, then pass 2 slipped stitches over the knit stitch so center stitch lies on top (slip stitch furthest from knit stitch and then slip the stitch closest to the knit stitch).
This decrease allows the finished stitches to lie in knitted order without appearing as a decrease stitch. Very cool.
I learned this decrease stitch while knitting a Debbie Bliss pattern "A-Line Coat".
New Bind Off For Me
I just finished a shawl for my granddaughter Rachel. The bind-off was very unique and different from any I had seen or used before. This information comes from the pattern Butterflies Shawl designed by Helene Rush for Knit One, Crochet Too.
Here are the directions:
Right side facing, *P2 tog, place stitch back to LH needle, P1, place stitch back to LH needle; repeat from * across until all stitches are BO.
This project finishes all my gift projects. Now I want to start a project for myself, a cost by Debbie Bliss. More about that later.
Tuesday, July 10, 2012
The Shell is Complete
I finally finished the Twigs and Bobbles Shell. I spent a good amount of time figuring the measurements for all the different sizes from 30 to 64. I now have the pattern written and ready to sell. I am thinking of offering it to one of the Ravelry groups that will knit the pattern and test to see if the directions are easy to understand and follow. And also to verify that my numbers, etc. are accurate.
Here is the photo of the finished shell. The color doesn't suit me, but the sweater still looks nice on me, I think.


Here are the instructions if you are reading this blog and want to try the pattern for free. Please be kind enough to share your thoughts about any part of this pattern. Thanks.
Here is the photo of the finished shell. The color doesn't suit me, but the sweater still looks nice on me, I think.


Here are the instructions if you are reading this blog and want to try the pattern for free. Please be kind enough to share your thoughts about any part of this pattern. Thanks.
TWIGS
AND BOBBLES SHELL
Designed by D. Teresa
Simmons
Duo Designs
Sizes/ Measurements:
30/35”, 32/37”, 34/39”, 36/41”, 38/43”, 40/45”,
42/47”, 44/49”, 46/51”, 48/53”, 50/55”, 52/57”, 54/59”, 56/61”, 58/63”, 60/65”,
62/67”, 64/72” (Size 38 knitted for pattern)
Supplies:
Yarn Plymouth
Yarn Linen Isle 8699/228292 DK/8 ply (11 wpi) 86 yds/50 gm per skein
Needles Sizes
3 and 6 standard
Size
6 dpns
Stitch Markers Two
Gauge:
5.5 sts 7.5 rws
per 1”
Abbreviations:
“ = inch(es) K
= knit sl = slip
1st = first Meas
= measures St
= stitch
Alt = alternate P
= purl Sts
= stitches
beg = beginning Pat
= pattern St
st = stockinette stitch
BO = bind off pm
= place marker Tbl
= through back of loop
CO = cast on Psso
= pass slipped stitch over Tog = together
Cont = continue Rem
= remaining tWrap
= wrap and turn
dec = decrease Rep
= repeat W/
= with
dpns = double pointed needles ret = returning WS
= wrong side
Estab = establish RS
= right side x = times
inc = increase Rws
= rows yf
= yarn forward
Patterns:
3-Stitch Twisted Rib
Row 1 (wrong side): k2, * p3, k2; rep from * to end.
Row 2: p2, * C3, p2; rep from * to end.
Rep these 2 rows.
[C3 (Cross 3) = k into front of 3rd st on needle,
then k 1st st in usual way slipping this st off needle. Now k 2nd
st in usual way, slipping 2nd and 3rd sts off needle
together]
Eyelet Twigs & Bobbles Lace Panel Stitches
(Worked over 16 sts on a background of st st.)
Row 1: (RS) k2, yf, k3 tog, yf, k3, yf, sl1, k2 tog, psso,
yf, k5.
Row 2 and every alt row: purl
Row 3: k1, yf, k3 tog, yf, k5, yf, sl1, k2 tog, psso, yf,
k4.
Row 5: MB, k5, yf, k3, tog, yf, k1, yf, sl1, k2 tog, psso,
yf, k3.
Row 7: k5, yf, k3 tog, yf, k3, yf, sl1, k2 tog, psso, yf,
k2.
Row 9: k4, yf, k3 tog, yf, k5, yf, sl1, k2 tog, psso, yf,
MB.
Row 11: k3, yf, k3 tog, yf, k1, yf, sl1, k2 tog, psso, yf,
k6.
Row 12: Purl
Rep these 12 rws.
[MB (Make Bobble) = k into front, back and front of next st,
turn and k3, turn and p3, turn and k3, turn and sl1, k2 tog, psso (bobble
completed).]
FRONT
RIBBING:
1.
With size 3 needles CO (85, 91, 95, 101, 105, 111, 115,
121, 125, 131, 135, 141, 145, 151, 155, 161, 165, 177) sts using a knit st CO.
2.
(WS): Tbl [k2, * p3, k2; rep from * to end.]
3.
Estab 3-Stitch Rib Pat on row 2. Work 20 rws. (3“)
4.
Rib to Body Increase Row (Row 21):
·
Size 30 - [k7, inc 1 in next st, k6, inc 1 in next st,
k7] 1x. [Inc 1 in next st, k6] 9x. (96 sts)
·
Size 32 - [k7, inc 1 in next st, k6, inc 1 in next st,
k7] 4x. [Inc 1 in next st, k7] 3x. (102 sts)
·
Size 34 - [k7, inc 1 in next st, k6, inc 1 in next st,
k7] 4x. [Inc 1 in next st, k6] 4x. (107 sts)
·
Size 36 - [k7, inc 1 in next st, k6, inc 1 in next st,
k7] 2x. [Inc 1 in next st, k7] 8x. (113 sts)
·
Size 38 - [k7, inc 1 in next st, k6, inc 1 in next
st, k7] 6x. [Inc 1 in next st, k7] 1x. (118 sts)
·
Size 40 - [k7, inc 1 in next st] 13x, k7. (124 sts)
·
Size 42 - [k7, inc 1 in next st, k6, inc 1 in next st,
k7] 4x. [Inc 1 in next st, k7] 6x. (129 sts)
·
Size 44 - [k8, inc 1 in next st, k7, inc 1 in next st,
k8] 1x. [Inc 1 in next st, k7] 12x. (135 sts)
·
Size 46 - [k7, inc 1 in next st, k6, inc 1 in next st,
k7] 2x. [Inc 1 in next st, k7] 11x. (140 sts)
·
Size 48 - [k8, inc 1 in next st, k7, inc 1 in next st,
k8] 3x. [Inc 1 in next st, k7] 9x. (146 sts)
·
Size 50 - [k7, inc 1 in next st] 16x, k7. (151 sts)
·
Size 52 - [k8, inc 1 in next st, k7, inc 1 in next st,
k8] 5x. [Inc 1 in next st, k7] 6x. (157 sts)
·
Size 54 - [k8, inc 1 in next st, k7, inc 1 in next st,
k8] 1x. [Inc 1 in next st, k7] 15x. (162 sts)
·
Size 56 - [k8, inc 1 in next st, k7, inc 1 in next st,
k8] 7x. [Inc 1 in next st, k7] 3x. (168 sts)
·
Size 58 - [k8, inc 1 in next st, k7, inc 1 in next st,
k8] 4x. [Inc 1 in next st, k7] 12x. (173 sts)
·
Size 60 - [k8, inc 1 in next st, k7, inc 1 in next st]
9x, k8] (179 sts)
·
Size 62 - [k8, inc 1 in next st, k7, inc 1 in next st,
k8] 5x. [Inc 1 in next st, k7] 9x. (184 sts)
·
Size 64 - [k8, inc 1 in next st, k7, inc 1 in next st,
k8] 1x. [Inc 1 in next st, k7] 19x. (198 sts)
5.
(RS): With size 6
needles, k(40, 43, 45, 48, 51, 54, 56, 59, 62, 65, 67, 70, 73, 76, 78,
81, 84, 91), pm, Row 1 Lace Pat, pm, k(40, 43, 46, 48, 51, 54, 57, 60,
62, 65, 68, 71, 73, 76, 79, 82, 84, 91).
6.
Work in Lace Pat st until piece meas
·
14.5” for size 30.
·
15” for sizes 32,34.
·
15.5 “ for sizes 36, 38.
·
16” for sizes 40, 42.
·
16.5” for sizes 44, 46, 48, 50, 52, 54, 56.
·
17” for sizes 58, 60, 62.
·
18” for size 64.
ARMHOLE SHAPING:
1.
At beg of next 2 rws BO 5 sts (sizes 30-38), 8 sts
(sizes 40-52), 11 sts (sizes 54-58), 12 sts (sizes 60-62), 14 sts (size 64).
2.
Dec 1 st each side, every other row 9x by sl1, k1, psso at beg
of each row and k2 tog at the end of each row.
3.
Cont in st st until piece meas 20, 20.5, 21, 21.5, 22,
23, 23.5, 23.5, 24, 24.5, 25, 25.5, 26, 26, 26.8, 27.5, 27.8, 29 inches
NECK SHAPING:
1.
Work to center 16 sts (sizes 30, 34, 36), 18 sts (sizes 32,
38, 44), 20 sts (sizes 40, 48, 52), 22 sts (sizes 42, 46, 50, 56), 24 sts
(sizes 54, 58, 60), 26 sts (size 62), 28 sts (size 64), attach another skein of
yarn, BO center sts as stipulated by size, complete row.
2.
Work both sides at once. BO 2 sts at each neck (not shoulder)
edge 2x (sizes 30-46, 54), 3x (sizes 48-52, 56-64).
3.
Dec 1 st at each neck edge, every other row 5x (sizes 30-32,
40-42), 6x (sizes 34-38, 48-52), 7x (sizes 44-46, 54-62), 8x (size 64).
4.
Cont in st st until piece meas 23, 23.5, 24, 24.5, 25,
26, 26.5, 27, 27.5, 28, 28.5, 29, 29.5, 30, 30.8, 31.5, 31.8, 33) inches from
start.
SHOULDER SHAPING:
1.
Using short rws, w/RS facing at right side of neck:
·
Row 1 – Knit.
·
Row 2 – P14, tWrap next st, turn, k to end.
·
Row 3 – P7, tWrap next st, turn, k to end.
·
Row 4 – P across all sts, picking up wraps.
·
Row 5 – BO all sts.
2.
Using short rws, w/RS facing at left side of neck as follows:
·
Row 1 – k14, tWrap next st, turn, p to end.
·
Row 2 – K7, tWrap next st, turn, p to end.
·
Row 3 – K across all sts, picking up wraps.
·
Row 4 – BO all sts.
BACK
Work as for FRONT but w/out the Lace Pat panel, including
the ARMHOLE SHAPING and excluding the FRONT NECK SHAPING until piece meas (23,
23.5, 24, 24.5, 25, 26, 26.5, 27, 27.5, 28, 28.5, 29, 29.5, 30, 30.8,
31.5, 31.8, 33) inches from start, ending w/WS row completed.
SHOULDER SHAPING:
1.
Row 1 – (RS facing) – k14, tWrap next st, turn, p to end.
2.
Row 2 – k7, tWrap next st, turn, p to end.
3.
Row 3 – k across all sts, picking up wraps.
4.
Row 4 – p14, tWrap next st, turn, k to end.
5.
Row 5 – p7, tWrap next st, turn, k to end.
6.
Row 6 – p across all sts, picking up wraps.
7.
Row 7 – BO all sts.
FINISHING
Seam sides and shoulder edges. Weave in loose yarn ends.
ARMHOLE EDGING:
With no sts on knitting needles, k an I-cord edging around
each armhole.
1.
W/two dpn, size 6, CO 3 sts. Do not turn, slide sts to other
end of needle.
2.
* K2 sts, pulling yarn tightly across the back to make a tube,
sl the 3rd st, and pick up 1 st from the knitted armhole edge and
psso. Sl the 3 sts just k back to the left needle and rep from * until edge is
covered w/I-cord.
·
Size 30 - total number of sts to pick up = 109
·
Size 32 - total number of sts to pick up = 109
·
Size 34 - total number of sts to pick up = 114
·
Size 36 - total number of sts to pick up = 114
·
Size 38 - total number of sts to pick up = 120
·
Size 40 - total number of sts to pick up = 132
·
Size 42 - total number of sts to pick up = 137
·
Size 44 - total number of sts to pick up = 137
·
Size 46 - total number of sts to pick up = 142
·
Size 48 - total number of sts to pick up = 148
·
Size 50 - total number of sts to pick up = 154
·
Size 52 - total number of sts to pick up = 159
·
Size 54 - total number of sts to pick up = 170
·
Size 56 - total number of sts to pick up = 176
·
Size 58 - total number of sts to pick up = 179
·
Size 60 - total number of sts to pick up = 189
·
Size 62 - total number of sts to pick up = 192
·
Size 64 - total number of sts to pick up = 198
3.
Join ends w/Kitchener st.
NECK EDGING:
1.
Knit a 15” 3 sts-I-cord using size 6 dpns.
2.
W/out breaking yarn and starting at one shoulder with RS
facing, k an I-cord edging picking up one st at a time around the neck edge ret
to the starting point at the shoulder edge.
·
Size 30 – total number of sts to pick up = 92
·
Size 32 - total number of sts to pick up = 96
·
Size 34 - total number of sts to pick up = 99
·
Size 36 - total number of sts to pick up = 99
·
Size 38 - total number of sts to pick up = 102
·
Size 40 - total number of sts to pick up = 100
·
Size 42 - total number of sts to pick up = 105
·
Size 44 - total number of sts to pick up = 109
·
Size 46 - total number of sts to pick up = 116
·
Size 48 - total number of sts to pick up = 118
·
Size 50 - total number of sts to pick up = 123
·
Size 52 - total number of sts to pick up = 119
·
Size 54 - total number of sts to pick up = 120
·
Size 56 - total number of sts to pick up = 128
·
Size 58 - total number of sts to pick up = 133
·
Size 60 - total number of sts to pick up = 133
·
Size 62 - total number of sts to pick up = 136
·
Size 64 - total number of sts to pick up = 146
3.
Cont the I-cord until it meas 15”.
4.
Weave in loose yarn ends.
5.
Tie the unattached I-cord endings into a bow.
Until next sharing, Teresa
Subscribe to:
Comments (Atom)